Vray Z Depth Tutorial Using Photoshop
Overview
There are many ways to enhance your 3d renderings after they are produced out of your favourite 3d application. Also known as post production. In the print world, 99% of all images you see in magazines, books, newsprint etc… have gone through some sort of processing. Similarly, 3d images need to be processed. This is also done is video, animation and audio production. Why? Un-processed content is unbalanced, flat, lacks visual impact, detail and life = boring. To meet the client’s expectations of high quality images, enhancing visual impact is a necessity especially if the underlying goal is to make money. Imagine the fashion industry without makeup on their models.
Introduction
In the following tutorial, I will demonstrate how to achieve realistic Bokeh (blur) using Autodesk 3dsmax passes and Photoshop. I know you can use the built-in vray and 3dsmax depth of field features but the following technique is much faster.. albeit a tad less precise. Below is an image of the layer stack we’ll be looking at. Note that the Alpha pass won’t be used in this tutorial. You be the judge to see if this technique is more efficient than using vray and 3dsmax’s features.
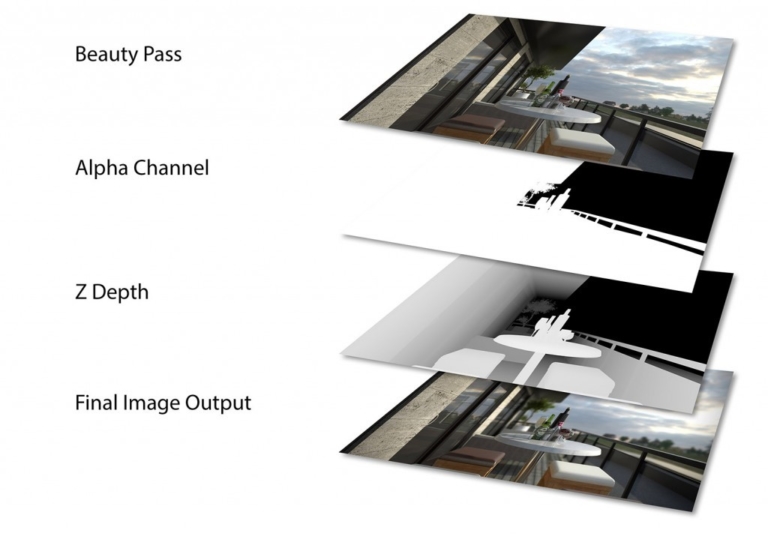
How do you get Bokeh in your renderings?
1) Before you open Photoshop, PhotoPaint or your fav photo editor, make sure you render out passes (specifically the zdepth pass). I won Save ’t be covering how you do that in this tutorial but you can find many other tutorials on the web to show you how to do that.
2) Now start your photo editor (in this case Photoshop and honestly not my preferred tool). For the purposes of simplicity, I’ll only be using these two passes. Open your passes files 1) beauty pass and 2) Z depth in Photoshop.
3) With your Zdepth pass file Open, Select All and Copy [CTRL+A] and [CTRL+C].

4) Now select your Beauty Pass file and create a new layer from background. On the right in the Layers panel, Right Click the Background image and Select “Layer from Background“.
5) In the same Layers panel, Click on the Channels Tab.
6) Now go to the above menus and select Layer > Layer Mask > Reveal All. Notice the Channels Panel on the right now has a new Channels layer called Layer 0 Mask.
7) Make sure you have the Channels Layer selected and paste press [CTRL+V] to paste the Zdepth pass we just copied in step (3). It should look like below.
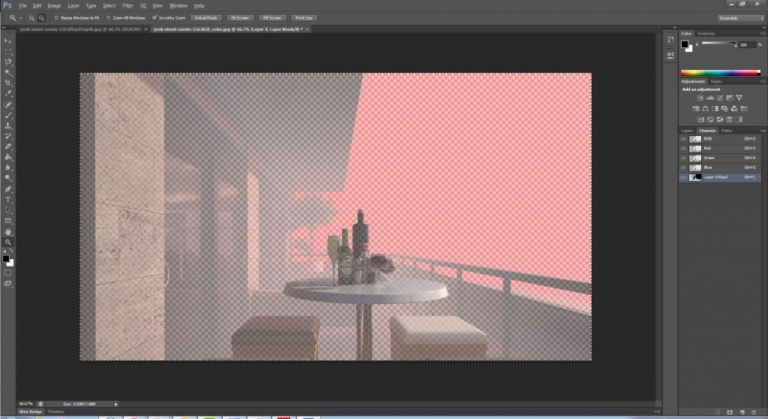
8) Now, back to the Layers Panel and Right Click and select Duplicate Layer.
9) Tricky part: Select the base layer and select the Zdepth icon (See Below) and Click and Drag to the Garbage Can below.
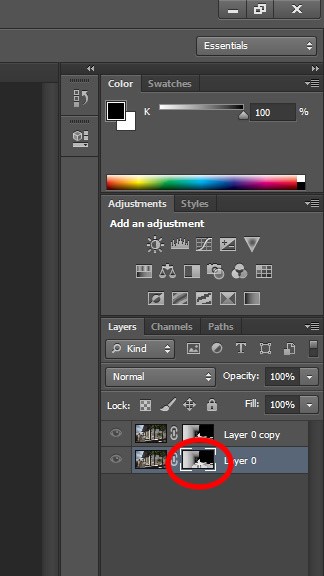
10) Now, make sure you have the Duplicated Layer active (top of stack). De-select everything CTRL+D. The flickering dotted line outlining the image will disappear.
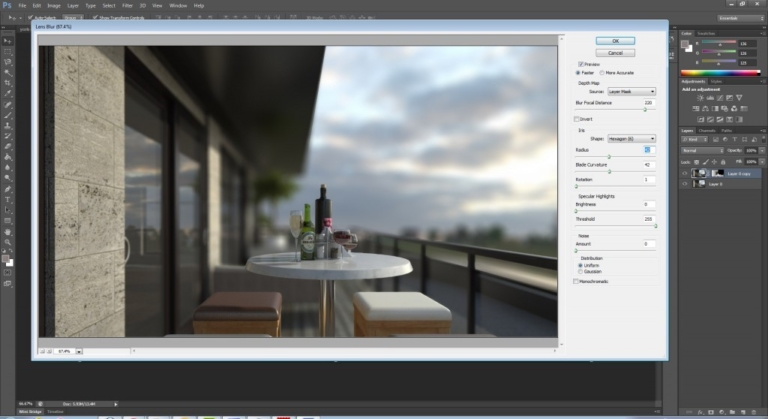
11) On the above navigation, Click Filter > Blur > Lens Blur. Should look like below.

12) This is where the fun starts! Make sure the Depth Map Source has the Layer Mask selected. Click anywhere on the image to decide where you would like to focus. Adjust the Radius to adjust your Bokeh (blur) effect. If you have evening or low light renderings, you might want to adjust your blades to be more rounded. Play with the settings as you wish. I don’t use the Noise, Specular Highlights and Distribution parameters. Just play around with the settings as you wish. Beauty is in the eye of the beholder!
Once you’re happy with the preview, click OK.
13) You’ll notice that there’s no change to the image! All that hard work in fine tuning the filter gone? No worries. In the Layer Panel, select the Zdepth icon (see Step 9 image) and drag to garbage can. Voila!
14) Flatten your image and now adjust your curves, contrast, tones, glow effects etc…